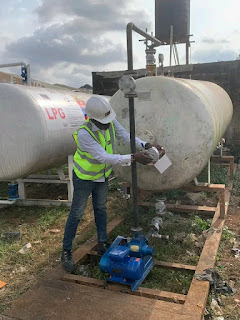
Hello LPG investors in the business. Have you've found water sneaking into your LPG gas storage tank, don't be afraid! If you've got water mixing with your precious LPG gas in the tank. As an experienced gas engineer, I'm here to walk you through the steps to get rid of that unwanted moisture.
1. Safety First
Before going into any repairs, make sure to turn off all gas valves and disconnect any power sources to the tank. Safety goggles and gloves are a must!
2. Drain the Tank
Begin by draining the tank completely to remove any liquid propane and water mixture. Use caution and follow proper procedures to avoid spills or accidents. Separate the layers, is the first step. Water and LPG don't play nice together, but they do have different densities. So, gently agitate the tank to encourage the water to settle at the bottom, beneath the LPG gas layer. Yes remember, this process actually involved that you drain all the gas in the tank. it is the only way. Unless
3. Utilize Gravity
Carefully open the tank's drain valve at the bottom to allow the water to flow out. Position a collection container beneath the valve to catch the water as it drains out. Ventilation is Key. Make sure there is proper ventilation in the tank area to allow any residual gas or fumes to dissipate safely.
Go slow and steady. Control the flow of water by adjusting the valve carefully. Take your time to avoid accidentally releasing any LPG gas along with the water, making sure you monitor carefully. Keep a close eye on the draining process so that only water is being extracted and no gas is escaping. If you notice any gas escaping, stop immediately and reassess the situation.
4. Inspection Time
Once the water has been removed, inspect the tank interior for any signs of damage, corrosion, or contamination. Address any issues promptly to prevent future problems. Test for gas quality right after draining the water, by conducting a gas quality test to ensure that the LPG remains uncontaminated and suitable for use.
5. Dry it Out
To capture any remaining water and moisture in the tank, introduce absorbent materials like clean rags or towels through the drain valve. These materials will soak up the water without absorbing the gas. Or by introducing a drying agent into the tank, such as anhydrous calcium chloride or silica gel. These substances absorb moisture and help dry out the tank interior.
6. Let it Sit:
Allow the drying agent to sit inside the tank for a period of time, typically 24 to 48 hours, to effectively absorb the water.
7. Drain and Dispose
After the drying period, carefully drain the drying agent from the tank and dispose of it properly according to local regulations.
8. Test for Residue
Perform a thorough inspection and testing to be sure that no residual moisture or contaminants remain inside the tank.
9. Seal it Up
Once the tank is completely dry and free of water, seal it tightly to prevent any future ingress of moisture. Seal the drain valve tightly to prevent any further ingress of moisture.
10. Monitor Regularly
Keep an eye on your tank regularly to detect any signs of water intrusion or corrosion. Prompt action can prevent costly repairs down the line.
READ MORE: How To Replace LPG Pump Dispenser Nozzle/Piston Gun


